Use a .csv file to manually upload team, location, and manager information
Dig into team-level activity, spend, and other insights by uploading org chart data. Use this Org chart data upload .csv file process when there isn't a supported API connection for the platform you use, or if you prefer to manually maintain your org chart information in Productiv. If you choose this manual process, we recommend that you schedule regular reminders to regularly upload the most recent employee data, such as monthly.
Each new upload acts as a source of truth as of the date of the upload to Productiv. Previous uploads are considered historical org chart data, which is visible when filtering Productiv insights to include those past dates.
This article includes information on:
- Preparing the data
- Downloading the .csv template to prepare for the information upload
- Completing the template with relevant information
- Uploading org chart information
- Mapping columns
- Mapping items and location data
Navigating to the org chart data
To navigate to the org chart data via .csv file process:
- Select the Settings icon in the left navigation list.
- Select the Org chart data/Connect org chart data option under Platform data.
- Select Upload .csv.
Preparing the data
You can export data from your HR system to generate a file with the information you want to upload into Productiv. The process for exporting this information will vary, depending on the HR system.
Productiv requires several fields and allows for uploading information in several additional optional fields. The following table shows information about which fields to prepare for upload.
|
Field name |
Required? |
Description |
Example |
|
Last name |
Yes |
Last name of employee |
Soranan |
|
First name |
Yes |
First name of employee |
Jamie |
|
Email address |
Yes |
Primary email address for employee in correct email format |
jamie@acme.com |
|
Team |
Yes |
The department or team in which the employee works |
Engineering |
|
No |
The building, city, region, or other location where the employee works |
Palo Alto |
|
|
Manager email address |
No |
The email for the employee's manager in correct email format |
mia@acme.com |
|
Secondary email addresses |
No |
One or more emails or app user IDs (separated by commas) to indicate other identifiers known to belong to this employee, useful when apps use a different identifier than primary email for provisioning |
j.soranan@acmeco.com, jamieGitHubID |
|
Legal hold status |
No |
Any information related to legal hold, such as litigation or regulations, related to this employee |
|
|
Worker status |
No |
The user's employment status |
contractor |
Downloading the template
On the Step 1: Download template page, select Download blank org chart .csv or Download current org chart .csv to download a spreadsheet with the columns that Productiv imports to populate your org chart information.
Completing the template
Using the template you downloaded, you'll enter the information for each employee that you want to upload as one row. To complete the template with the required information, complete the following steps:
- Enter each employee's last name in the Last name column.
- Enter each employee's first name in the First name column.
- Enter each employee's email address in the Email address column.
- Enter the team in which the employee is a member in the Team column. We recommend aiming for 50 (or less) unique team names, although Productiv can upload up to 100 teams. Read more about mapping teams into groups if you have more than 100 teams.
To include optional information for additional team and location insights, complete any of the following steps:
- Enter each employee's job title in the Job title column. Productiv can use employee's job titles to create custom segments for analyzing employee app usage.
- Enter each employee's location in the Location column. We recommend aiming for 50 (or less) unique locations, although Productiv can upload up to 100 location names. Read more about mapping locations into groups if you have more than 100 locations.
- Indicate each employee's manger by entering the manager's email address in the Manager email address field. This information must be formatted as a valid email address. Productiv can use this information to segment data for analyzing app usage by employees with the same manager.
- Enter any additional email addresses or IDs/user names associated with specific applications for each employee in the Secondary email addresses field. These additional identifiers are used to segment data by team for each application, as well as in provisioning workflows and creating exempt lists.
- To indicate the user's worker status, enter the status in a new column, titled Worker status (i.e., employee, contractor, etc.).
- If a user's information is subject to litigation, regulations, or other legal issues, enter the status in a new column, titled Legal hold status.
Make sure to save the template as a .csv file to prepare for uploading it.
Select Next in the upper right corner of Productiv to proceed to Step 2.
Uploading org chart information
On the Step 2: Upload org chart in .csv page, complete the following steps:
- Select Upload org chart .csv.
- Select the Productiv_HR_Data_template.csv file you prepared.
- Check the I understand... box to indicate that you understand that this upload will replace your current data. Previously uploaded org chart data will be available as historical data.
Select Next in the upper right corner of Productiv to proceed to Step 3.
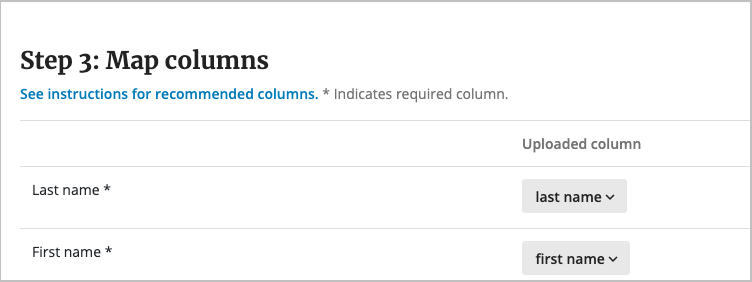
Mapping columns
Once you have uploaded a .csv file with your org chart information, Productiv reads the uploaded columns and attempts to map them to the related Productiv fields on the Step 3: Map columns page. To adjust the uploaded column mappings, complete the following steps:
- For each Productiv field listed on the left, select an Uploaded column from the dropdown to map the correct data:
- When all of the columns have been mapped, select Finish importing in the upper right corner.
The data is ingested and will begin populating across Productiv as usage and log in information is collected for connected applications.
For the first time data is uploaded, it will recalculate all historic analytics data against team insights. On subsequent updates, new employee data will be reflected with matching app data dates, going forward from the uploaded date (typically app data lags current date by 3-5 days).
Mapping team and location data
If you have more than 100 teams or 100 locations, Productiv will group the smallest teams or locations together into one team or location. Select Keep default mapping or Group teams/Group locations to adjust the data groupings.
Comments
0 comments
Article is closed for comments.